The Test Bench
Because BoxLambda for the most part integrates existing components that have already been verified by their respective owners, the focus is on system-level testing rather than component-level verification. In the few areas where BoxLambda does introduce significant new logic, component and/or module-level verification is done. Component-level verification and system-level testing use different test benches.
The System-Level Test Bench
The system-level test bench should allow for the following:
- Execute system-level test cases in a reasonable time frame. With system-level test cases, I mean test cases where the DUT is the SoC.
- A short lather-rinse-repeat cycle of making code changes and testing them on a system-level DUT.
- Full signal visibility into the build, to aid test case development as well as debugging.
- Reasonably easy automated testing. With the caveat that automated testing is never truly easy.
Verilator
Boxlambda uses Verilator to create system test benches. Verilator is a compiler. It compiles, or rather verilates, an HDL design into a C++ model. It then picks up any user-provided C++ testbench/wrapper code and compiles the whole thing into an executable, optionally with the ability to generate traces.
C++ is not an ideal language for test case development, but it'll get the job done, and it's a compiled language, so it's fast.
A Simple Test Bench
The proof-of-concept system test bench for BoxLambda is based on the example code included in the Verilator distribution:
https://github.com/verilator/verilator/blob/master/examples/make_tracing_c/sim_main.cpp
I included UARTSIM, the UART co-simulation class that ZipCPU provides along with the UART Verilog implementation in the wbuart32 repository:
https://github.com/epsilon537/wbuart32/tree/master/bench/cpp
The test bench does the following:
- Instantiate the verilated Hello World model and the UARTSIM co-simulation object.
- Optionally, controlled by a command-line option, enable tracing.
- Optionally, controlled by a command-line option, wait for an OpenOCD connection.
- Run the model for a fixed number of clock cycles.
-
While running the model:
- Feed characters into UARTSIM's transmit path, i.e. towards the model.
- Feed the model's UART output to UARTSIM and UARTSIMs output to the model's UART input.
- Capture and display the decoded UARTSIM output and the GPIO outputs.
-
Pass/Fail criterium: After running the model for the set number of clock cycles, match the captured UART and GPIO outputs against the expected results.
As suggested by ZipCPU in his Verilog tutorial, I use nCurses for positional printing inside the terminal windows. This way, I can easily build a display that refreshes, rather than scrolls, whenever the model produces new UART or GPIO data to display.
This is the source code of the proof-of-concept test bench:
https://github.com/epsilon537/boxlambda/blob/master/gw/projects/hello_world/sim/sim_main.cpp
Other, more elaborate system test benches include:
- gw/projects/vera_integrated/sim/sim_main.cpp: This test bench captures the DUT's VGA output and renders it to an SDL frame buffer.
- gw/projects/sdspi_test/sim/sim_main.cpp: This test bench includes ZipCPU's SDSPISIM co-simulator.
- gw/projects/ym2149_dac_test/sim/sim_main.cpp: This test bench captures the Audio DAC bitstream and PSG's PCM output and saves it off to two Python files for further analysis by a Python script.
Are we running in a Simulation?
Software running on Ibex needs to know whether it's running in a simulation or on FPGA, so it can adjust timings such as the LED blink period. I'm using GPIO1 bits 3:0 for this purpose. In a simulation, I set these bits to 4'bf. On FPGA I set them to something else. The hello.c test program includes the following check:
  //GPIO1 bits3:0 = 0xf indicate we're running inside a simulator.
  if ((gpio_get_input(&gpio1) & 0xf) == GPIO1_SIM_INDICATOR)
    uart_printf(&uart0, "This is a simulation.\n");
  else
    uart_printf(&uart0, "This is not a simulation.\n");
Files and Command Line Options
All files created by Verilator go into the <build_dir>/gw/projects/<project> directory. The name of the generated executable is Vmodel. As you can see in the sim_main.cpp source code, Vmodel accepts a few command line options:
- Vmodel -t: Execute with waveform tracing enabled. The program generates a .fst trace file in the current directory. .fst files can be viewed with gtkwave.
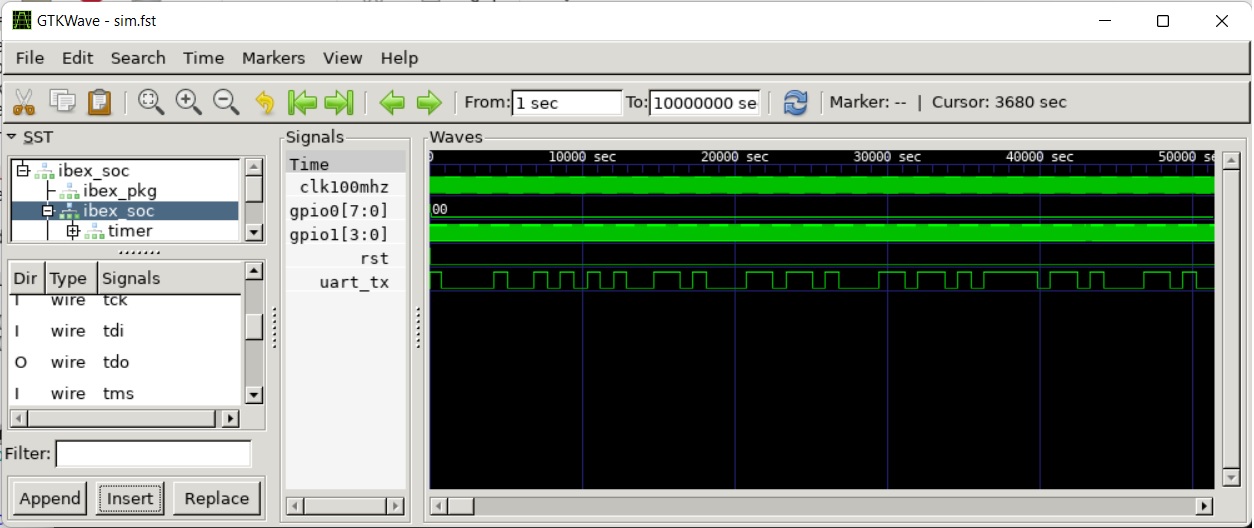 Gtkwave View of Waveform Trace Generated by Hello World Verilator Test Bench
- Vmodel -i: Run in interactive mode, vs. the default batch mode. In interactive mode, the program may wait for keypresses. Batch mode is used for non-interactive automated testing.
Running Regression Tests
CMake comes with a regression test framework called Ctest. BoxLambda regression tests are only defined in a simulation build tree. To see a list of available test cases, you need to first build everything and then run a ctest -N command to list the test cases:
cd <boxlambda root dir>/build/sim
make all
ctest -N
You should see something like this:
Test project /home/epsilon/work/boxlambda/build/sim2
  Test #1: hello_world_test
  Test #2: hello_dbg_test
  Test #3: picolibc_test_test
  Test #4: ddr_test_test

Total Tests: 4
To run a specific test, run the following command from the build directory:
ctest -I <test number>
To run all tests, just run the ctest command without any parameters.
The Component-Level Test Bench
CoCoTB is used for component-level verification. Icarus is used as the behind-the-scenes simulator for CocoTB.
An example of a CoCoTB test bench is the PicoRV DMA test bench. This is the test script:
https://github.com/epsilon537/boxlambda/blob/master/gw/components/picorv_dma/test/picorv_dma_test.py
The test bench is added as a CMake test to the build system, like this:
add_test(NAME picorv_dma_cocotb_test
    COMMAND ${PROJECT_SOURCE_DIR}/scripts/cocotb_test.sh ${CMAKE_CURRENT_LIST_DIR}/test/picorv_dma_test.py
    WORKING_DIRECTORY ${CMAKE_CURRENT_BINARY_DIR}
)
Note that a cocotb_test.sh wrapper script is used to execute the test. This script sets up the environment and makes sure that a .fst waveform is generated when the test is run. Because this particular test has software dependencies, a build step needs to be executed before the test can be run:
~/work/boxlambda/build/sim-a7-100/gw/components/picorv_dma$ make picorv_dma_test
[ 25%] Built target picorv_progmem_data_access
[ 50%] Built target picorv_wr_hir_regs
[ 50%] Built target picorv_hir_regs_copy
[ 75%] Built target picorv_irq_in_out
[ 75%] Built target picorv_wordcopy
[ 75%] Built target picorv_bytecopy
[100%] Dummy target to collect test dependencies.
[100%] Built target picorv_dma_test
~/work/boxlambda/build/sim-a7-100/gw/components/picorv_dma$ ctest -V
...
1: Test command: /home/epsilon/work/boxlambda/scripts/cocotb_test.sh "/home/epsilon/work/boxlambda/gw/components/picorv_dma/test/picorv_dma_test.py"
1: Working Directory: /home/epsilon/work/boxlambda/build/sim-a7-100/gw/components/picorv_dma
1: Test timeout computed to be: 10000000
1: Script directory: /home/epsilon/work/boxlambda/scripts
1: PYTHONPATH: .:/home/epsilon/work/boxlambda/scripts:
1:      -.--ns INFO     gpi                                ..mbed/gpi_embed.cpp:76   in set_program_name_in_venv        Did not detect Python virtual environment. Using system-wide Python interpreter
1:      -.--ns INFO     gpi                                ../gpi/GpiCommon.cpp:101  in gpi_print_registered_impl       VPI registered
1:      0.00ns INFO     cocotb                             Running on Icarus Verilog version 13.0 (devel)
1:      0.00ns INFO     cocotb                             Running tests with cocotb v1.9.0.dev0 from /home/epsilon/oss-cad-suite/lib/python3.8/site-packages/cocotb-1.9.0.dev0-py3.8-linux-x86_64.egg/cocotb
1:      0.00ns INFO     cocotb                             Seeding Python random module with 1695898255
1:      0.00ns INFO     cocotb.regression                  Found test picorv_dma_test.picorv_reset
1:      0.00ns INFO     cocotb.regression                  Found test picorv_dma_test.wbs_access_to_program_memory
...
1:      0.00ns INFO     cocotb.regression                  running picorv_reset (1/8)
...
The waveform is available in the picorv_dma_test_sim_build/ subdirectory:
~/work/boxlambda/build/sim-a7-100/gw/components/picorv_dma$ ls picorv_dma_test_sim_build/
dumpWaves.v  results.xml  sim.vvp  waves.fst