Picolibc
-
PicoLibc Version: 1.8.1
-
PicoLibc Repo, BoxLambda fork, boxlambda branch: https://github.com/epsilon537/picolibc
-
PicoLibc Submodule in the BoxLambda Directory Tree: boxlambda/sub/picolibc/.
-
PicoLibc Website: https://keithp.com/picolibc/
-
Bootstrap Software Component in the BoxLambda Directory Tree: boxlambda/sw/components/bootstrap
BoxLambda uses the Picolibc standard C library implementation. Picolibc is a Newlib variant, blended with AVR libc, optimized for systems with limited memory. Newlib is the de-facto standard C library implementation for embedded systems.
Building Picolibc
Picolibc Configuration Scripts - RV32IMC
A Picolibc build for a new system requires configuration scripts for that system in the picolibc/scripts/ directory. The scripts are named after the selected processor configuration. They specify such things as the compiler toolchain to use, GCC processor architecture flags, and CPP preprocessor flags tweaking specific library features.
I'm using RISCV ISA-string rv32imc as the base name for the new scripts I'm creating. This corresponds with the default -march value of BoxLambda's GCC toolchain:
riscv32-unknown-elf-gcc -Q --help=target
The following options are target-specific:
  -mabi=                                ilp32
  -malign-data=                         xlen
  -march=                               rv32imc
  -mbranch-cost=N                       0
  -mcmodel=                             medlow
  -mcpu=PROCESSOR
  -mdiv                                 [disabled]
  -mexplicit-relocs                     [disabled]
  -mfdiv                                [disabled]
  -misa-spec=                           2.2
  -mplt                                 [enabled]
  -mpreferred-stack-boundary=           0
  -mrelax                               [enabled]
  -mriscv-attribute                     [enabled]
  -msave-restore                        [disabled]
  -mshorten-memrefs                     [enabled]
  -msmall-data-limit=N                  8
  -mstrict-align                        [disabled]
  -mtune=PROCESSOR

  Supported ABIs (for use with the -mabi= option):
    ilp32 ilp32d ilp32e ilp32f lp64 lp64d lp64f

  Known code models (for use with the -mcmodel= option):
    medany medlow

  Supported ISA specs (for use with the -misa-spec= option):
    2.2 20190608 20191213

  Known data alignment choices (for use with the -malign-data= option):
    natural xlen
The easiest way to create the new scripts is to derive them from existing scripts for similar platforms. I derived the rv32imc configuration files from the existing rv32imac configuration files:
- do-rv32imc-configure is based on do-rv32imac-configure.
- cross-rv32imc_zicsr.txt is based on cross-rv32imac_zicsr.txt.
- run-rv32imc is based on run-rv32imac.
Zicsr stands for RISCV Control and Status Registers. These are always enabled on Ibex.
The differences between the derived scripts and the base scripts are minimal:
- They are referencing the riscv32-unknown-elf GCC toolchain used by BoxLambda.
- The -march flag is set to rv32imc (no 'a' - atomic instructions).
picolibc_build.sh
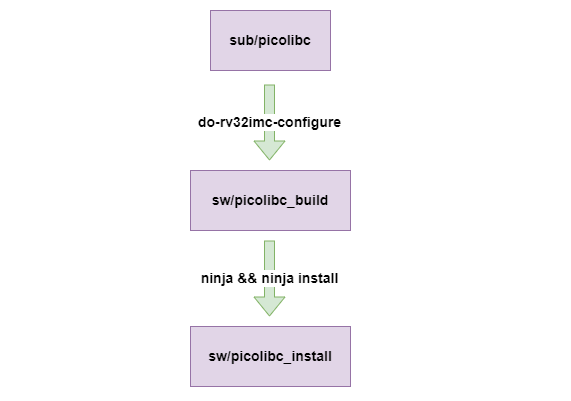
With the configuration scripts in place, we can build and install the picolibc library. We have to supply a build directory and an install directory. I put the build directory in boxlambda/sw/picolibc-build and the install directory in boxlambda/sw/picolibc-install.
I grouped the PicoLibc build and install instructions in a picolibc_build.sh shell script. The PicoLibc install directory is checked in so there's no need to run the picolibc_build.sh as part of the repository setup. The script is only needed in case we want to regenerate the PicoLibc library (e.g. after updating to a newer version of the library).
Bootstrap - Some Glue Required
Picolibc on BoxLambda.
Picolibc is a relatively generic code base that needs to be tied to the platform it's running on to function properly. To bring up the library on BoxLambda, we need to supply three pieces of code: - A Vector Table - A Link Map - Standard IO Setup
More detail for each of these follows in the subsections below. I have grouped them into a single software component called bootstrap:
https://github.com/epsilon537/boxlambda/tree/master/sw/components/bootstrap
An application wishing to use the standard C library has to link in this bootstrap component along with the PicoLibc library itself.
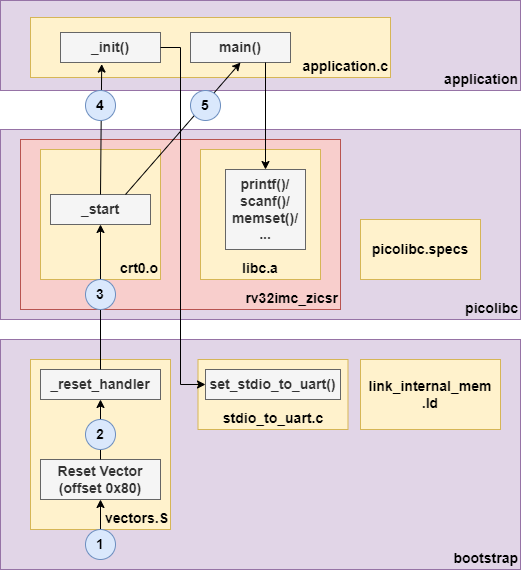
The Vector Table
The vector table is a table with code entry points for all sorts of CPU events: interrupts, exceptions, etc. The Boot/Reset Vector, i.e. the very first instruction executed when the CPU comes out of reset, is part of this table.
I'm using the Vector Table from the Hello World example program included in the ibex_wb repository. The Vector Table file is located at boxlambda/sw/components/bootstrap/vectors.S.
The Ibex Boot/Reset vector is at offset 0x80. After some CPU register initialization, the code branches off to _start, the entry point into PicoLibc's crt0 module.
Crt0, C-Run-Time-0, is the Standard C library code in charge of setting up a C environment (zeroing the BSS segment, setting up the stack, etc.) before calling main().
Standard Input, Output, and Error
The PicoLibc integrator needs to supply stdin, stdout, and stderr instances and associated getc() and putc() implementations to connect them to an actual IO device. We'll be using the UART as our IO device for the time being. Down the road, we can extend that with keyboard input and screen output implementation.
static struct uart *uartp = 0;

static int uart_putc(char c, FILE *file) {
  int res;

  (void) file;      /* Not used in this function */

  if (!uartp) {
    res = EOF;
  }
  else {
    while (!uart_tx_ready(uartp));
    uart_tx(uartp, (uint8_t)c);
    res = (int)c;
  }

  return res;
}

static int uart_getc(FILE *file) {
  int c;
  (void) file;      /* Not used in this function */

  if (!uartp) {
    c = EOF;
  }
  else {
    while (!uart_rx_ready(uartp));
    c = (int)uart_rx(uartp);
  }

  return c;
}

static FILE __stdio = FDEV_SETUP_STREAM(uart_putc,
                    uart_getc,
                    NULL,
                    _FDEV_SETUP_RW);


FILE *const stdin = &__stdio;
FILE *const stdout = &__stdio;
FILE *const stderr = &__stdio;

void set_stdio_to_uart(struct uart *uart) {
  uartp = uart;
}
boxlambda/sw/components/bootstrap/stdio_to_uart.c
The set_stdio_to_uart() function is to be called from the application before any standard library calls that require standard IO. The application needs to provide a pointer to an initialized uart object.
The Link Script
We have to tell the linker where in memory to place the program code, data, and stack.
The link script is based on the one provided by PicoLibc, with modifications for BoxLambda's CMEM/DMEM Harvard architecture and heap in EMEM external memory.
The link script expects the following symbols to be set at the beginning of the script:
- __cmem and __cmem_size: CMEM or code memory contains text (instructions) and load segments.
- __dmem and __dmem_size: DMEM or data memory contains data segments, BSS and stack.
- __emem and __emem_size: EMEM stands for external memory. The heap will be placed here.
- __heap_size: The heap size.
- __stack_size: The stack size.
In the link script, I also defined a .cmem_bss section, mapped to CMEM, so it is still possible to put data in CMEM by assigning it to this section.
/*Create some data buffers in CMEM by mapping them to the .cmem_bss segment.*/
char cmem_str[32] __attribute__ ((section (".cmem_bss")));
Similarly, I created a .dmem_text section so code can still be put in DMEM if needed.
/*This function executes from DMEM.*/
__attribute__ ((section(".dmem_text")))
int code_in_dmem(char *message) {
    int i, j;
...
I created two variants of this link script:
- link_internal_mem_64K.ld: 32 KB CMEM, 32 KB DMEM, 128 MB heap, and 512 bytes of stack
- link_internal_mem_256K.ld: 128 KB CMEM, 128 KB DMEM, 128 MB heap, and 512 bytes of stack.
Linking against the Picolibc library: The Picolibc GCC specs file
To link the PicoLibc library into an application image, the PicoLibc spec file needs to be passed to GCC. The Picolibc GCC specs file expects absolute paths, however. I'm using CMake's configure_file() to replace placeholders in scripts/picolibc.specs.in with the project source directory's absolute path. The resulting picolibc.specs is written in the root of the build tree. This way, the Picolibc library build for BoxLambda can be checked into the source tree and the user won't need to build and install it from source when setting up BoxLambda.
The code snippet below is taken from the SW CMakeList:
#The GCC specs file expects absolute paths. I'm using configure_file() to replace placeholders
#in picolibc.specs.in with PROJECT_SOURCE_DIR. The resulting picolibc.specs is written in the root of the build tree.
configure_file(${PROJECT_SOURCE_DIR}/scripts/picolibc.specs.in picolibc.specs @ONLY)

#Set the generated specs files as standard compile and link options.
set(SPECS "--specs=${CMAKE_CURRENT_BINARY_DIR}/picolibc.specs")
add_compile_options(${SPECS})
add_link_options(${SPECS} "LINKER:--gc-sections")
The Picolibc Test Application
The test application program running on the Ibex processor is located in sw/projects/picolibc_test/picolibc_test.c
#include <stdio.h>
#include <string.h>
#include "stdio_to_uart.h"
#include "uart.h"
#include "platform.h"

static struct uart uart0;

//_init is executed by picolibc startup code before main().
void _init(void) {
  //Set up UART and tie stdio to it.
  uart_init(&uart0, (volatile void *) PLATFORM_UART_BASE);
  uart_set_baudrate(&uart0, 115200, PLATFORM_CLK_FREQ);
  set_stdio_to_uart(&uart0);
}

int main(void) {
  int v = 123;
  static char m[10] = {0};
  char c;

  //Some basic libc tests:

  memset(m, '!', sizeof(m)-1);

  printf("printf in main() v=%d, m=%s.\n", v, m);

  printf("Enter character: ");
  c = getc(stdin);
  printf("Character entered: ");
  putc(c, stdout);

  return 0;
}
Notice the _init() function. This function is executed by the PicoLibc startup code before calling main(). This is where we set up the UART and stdio.
Footprint
| Code (KB) | RO-Data (KB) | RW-Data (KB) | |
|---|---|---|---|
| Picolibc + GCC | 9.6 | 1.3 | 0.1 |
| Stack | 0 | 0 | 0.5 |