DFX Test
DFX Test
J1B is a 32-bit, minimal instruction set stack processor. It's one of the supported host CPUs of the SwapForth environment.
To demonstrate DFX support in BoxLambda, I created a test program called dfx_test that loads a J1B core into the SoC's Virtual Socket 0 and then boots the SwapForth run-time firmware image on this core, presenting the user with a Forth REPL.

The DFX Test Program.
The DFX Test Program is not an automatic test case like the previous BoxLambda test cases. It runs exclusively on the Arty-A7-100T and requires user interaction through a CLI. The CLI commands are grouped into modules:
-
dfx_cli: This is a CLI wrapper around the dfx_hal component. Most commands let you interact with the DFX Controller at a low level. However, there's one high-level command,
dfx_load_module, that implements the entire sequence of loading an RM's bitstream file from the filesystem into the VS0 RP.* dfx_control dfx_control <cmd> <extra byte> <extra halfword> : Write to DFX Control Register. * dfx_status Retrieve DFX status. * dfx_trig_get Read DFX Trigger registers. * dfx_trig_set dfx_trig_set <trig_id> * dfx_rm_info_get Get Reconfigurable Module Info * dfx_bs_info_get Get Bitstream Info * dfx_bs_info_set dfx_bs_info_set <idx> <hex address> <size in bytes> * dfx_read_core_sig Read core's signature register * dfx_load_module dfx_load_module <filename> -
j1b_cli: This CLI allows you to boot the SwapForth firmware image on the J1B core and to transfer serial port I/O to the J1B providing access to its REPL.
* j1b_boot j1b_boot <filename>: Boot J1B core with given FW image. * j1b_fwd_uart Forward UART I/O to J1B. -
mem_fs_cli: This CLI module provides file system commands such as
lsandrmas well as commands for loading files into memory and save memory buffers to files.* rm rm <filename> : Remove (delete) file. * save save <filename> <address> <size in bytes> : write memory contents to file. * load load <filename> [address] : read file into memory. Alloc mem. buf. if addr. not given. * allocBuf allocBuf <size> : allocate from heap buffer of given size. * relBuf relBuf <address> : release the buffer at given address. * ls list directory contents. -
ymodem_cli: The
ymodem_rxcommand allows you to transfer files from the host PC to BoxLambda's SD Card file system. I use it to transfer the RM bitstreams and J1B firmware to BoxLambda. While I could copy everything onto an SD card and then move that card from PC to BoxLambda, I prefer this method as it involves fewer moving parts.* ymodem_rx ymodem_rx <filename>: Ymodem rx and save to give file. * ymodem_tx_buf ymodem_tx_buf <filename> <hex address> <size_in_bytes>: Ymodem transmit given memory buffer with given filename
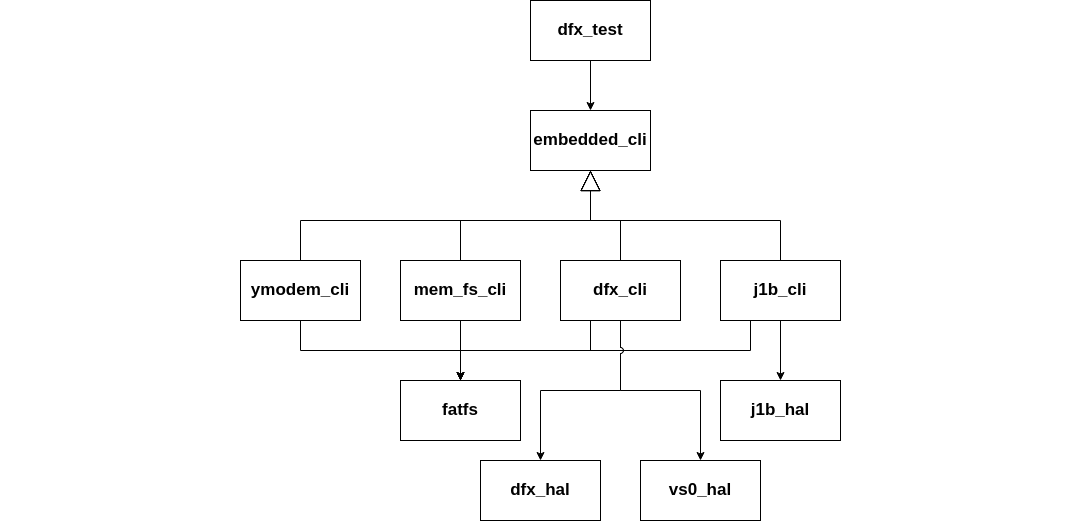
Structure of the dfx_test software program.
The DFX Test on FPGA
Hook up the MicroSD PMOD as described here and insert a FAT-formatted SD card.
Connect a terminal emulator to Arty's USB serial port. I suggest using a terminal emulator that supports Ymodem transfers such as Minicom. Settings: 1000000 8N1.
Make sure the four switches on the Arty are not all-off (the bootloader would wait for a debugger to connect) or all-on (the software project would assume it's running in a Verilator simulation).
Build the dfx_test software project in the arty-a7-100 build tree:
cd build/arty-a7-100/sw/projects/dfx_test
make dfx_test
Flash the dfx_test program onto the target:
make dfx_test_flash_sw
Build the boxlambda_dfx gateware project in the arty-a7-100 build tree:
cd build/arty-a7-100/gw/projects/boxlambda_dfx
make boxlambda_dfx_bit
Flash the gateware build onto the target:
make boxlambda_dfx_flash_gw
When flashing has been completed, the target should boot up. You should see the following messages:
Starting...
Initializing SDRAM @0x20000000...
Switching SDRAM to software control.
Read leveling:
  m0, b00: |00000000000000000000000000000000| delays: -
  m0, b01: |11111111111111111111111111111100| delays: 14+-14
  m0, b02: |00000000000000000000000000000000| delays: -
  m0, b03: |00000000000000000000000000000000| delays: -
  m0, b04: |00000000000000000000000000000000| delays: -
  m0, b05: |00000000000000000000000000000000| delays: -
  m0, b06: |00000000000000000000000000000000| delays: -
  m0, b07: |00000000000000000000000000000000| delays: -
  best: m0, b01 delays: 14+-14
  m1, b00: |00000000000000000000000000000000| delays: -
  m1, b01: |11111111111111111111111111111100| delays: 14+-14
  m1, b02: |00000000000000000000000000000000| delays: -
  m1, b03: |00000000000000000000000000000000| delays: -
  m1, b04: |00000000000000000000000000000000| delays: -
  m1, b05: |00000000000000000000000000000000| delays: -
  m1, b06: |00000000000000000000000000000000| delays: -
  m1, b07: |00000000000000000000000000000000| delays: -
  best: m1, b01 delays: 14+-14
Switching SDRAM to hardware control.
SDRAM init OK.
Mounting filesystem...
CID: 534d5402:47323341:7d604971:3168018d
Reading VS0 core signature register...
Read signature value: 0x510b
Starting CLI...
Build the vs0_j1b RM component in the arty-a7-100 build tree:
cd build/arty-a7-100/gw/components/vs0_j1b
make vs0_j1b_bit
Build the vs0_stub RM component in the arty-a7-100 build tree:
cd build/arty-a7-100/gw/components/vs0_stub
make vs0_stub_bit
Transfer the following files to an SD Card and rename them to something short:
build/arty-a7-100/gw/components/vs0_j1b/vs0_j1b_pblock_vs0_partial.bin.bin_for_icap: This is thevs0_j1bRM Partial Bitstream file. Let's rename it tovs0_j1b.build/arty-a7-100/gw/components/vs0_stub/vs0_stub_pblock_vs0_partial.bin.bin_for_icap: This is thevs0_stubRM Partial Bitstream file. Let's rename it tovs0_stub.sw/projects/dfx_test/nuc.bin: This is the SwapForth firmware image for the J1B processor.
Insert the SD Card in BoxLambda's MicroSD card slot.
Alternatively, instead of copying the files to an SD Card mounted on your PC and then moving the SD Card to BoxLambda, you can leave a card inserted into BoxLambda's SD Card slot and transfer the files using the Ymodem protocol. To do that, enter the following command on the CLI:
ymodem_rx <filename>
Then send the file in question using your terminal emulator's ymodem function. The transferred file will be saved on the SD card using the given filename.
Confirm that all the required files are on the filesystem by running the ls CLI command:
> ls
   <DIR>   SYSTEM~1
     32768 NUC.BIN
    592780 VS0_J1B
    592780 VS0_STUB
1 dirs, 3 files.
At this point, the RM equipped in the VS0 RP is vs0_stub. Let's switch over to the vs0_j1b RM. Enter the following command on the CLI:
> dfx_load_module vs0_j1b
Loading file vs0_j1b, size: 592780 bytes, into memory at address 0x20008370.
Installing RM...
Done.
Now we can boot the J1B firmware:
> j1b_boot nuc.bin
Reading core signature register...
Read signature value: 0xf041011b
Signature correct.
Loading file nuc.bin, size: 32768 bytes, into memory at address 0x20000368.
Booting J1B...
Taking J1B out of reset...
Done.
Finally, we forward the serial port to the J1B core so we can access its REPL:
> j1b_fwd_uart
Reading core signature register...
Read signature value: 0xf041011b
Signature correct. Checking if J1B has been booted up...
Forwarding UART. Press <ESC> to return.
You can now start entering Forth instructions.
CR 42 emit CR
*
 ok
Optionally, exit out of the REPL and switch back to the vs0_stub RM:
Returning to shell...
> dfx_load_module vs0_stub
Loading file tst_stub, size: 592780 bytes, into memory at address 0x20008370.
Issuing DFX trigger...
DFX loading...
DFX state: 4
DFX state: 7
Done.
>